 Look! Pictures! This first one shows a 6" square each of backing, batting (any kind will do, I am even piecing my scraps together - butt 2 pieces of batting together and zig zag!), and a solid. Stack these into a sandwich with the solid fabric on top.
 The second photo shows that sandwich, and the pieces of binding needed. From the same solid fabric as the 6" square, cut 2 each - 3 1/2 " x 6", and 3 1/2" x 7 1/2". (The samples on the left and bottom.) Fold each piece in half lengthwise, and press. (The samples on the top and right)
 Place the raw edges of the 6" pieces on the edge of two sides of the 6" sandwich. Stitch 1/2" from the edge. I press binding away from the top of the sandwich, then I fold the binding onto the back of the sandwich and pin. Turn the sandwich over, and stitch 1/4" from the edge. (I have been using black thread for this. It saves from having to match thread to the solid color fabric and is consistent with the knots.)
 It will look like this from the back,
 and, like this from the front! If needed, trim the edges.
Center the 7 1/2" binding strips across the 2 remaining sides, and stitch 1/2" from the edge.
If you look closely you can see how the binding is turned in the next picture. So, just like with the other sides, you press the binding so it is away from the top of the square. This time, you will first turn the excess binding in towards the back of the quilt, over the edge of the first binding. This is kinda visible on the left side of the following picture.
 Once the excess is folded in, you can fold the rest of it over like the other 2 sides. It takes a little practice, but you can do it! Now, stitch 1/4" from the edge with the black thread on top. Leave extra long tails at both ends of this top stitching. It's too bulky to back- stitch, so I pull the black thread to the back and tie each end off to secure it. I tried to show you that in the 2nd photo.
 See the long tails for securing the threads?
I know this seems like a couple of extra steps for the binding, but this will give a little more stability t o the edges. They will be taking on some stress.
Now you are ready to make french knots! Or, some folks have elected to put seed beads on as a variation on the theme. It also occurred to me that if one wanted to count out 212 beads worth of bead chain, that could be couched on. Couching tutorial later if there is interest.
I have been putting my 212 knots on each block in a spiral starting at the center. After every 10 knots, I make a small stitch. This saves on alot of counting. Once I get closer to the outside and feel like I'm getting close to 212 knots, I can count the stitches by 10's. To start the spiral, I make a knot just a little off center, and make the next knot about 1/4" to the left, and again, and again, it's kind of a square at this point, so I make a concerted effort to make the fifth knot abit above and a bit out, and that is where the spiral begins. (I will try to remember a photo of the beginning knots). The spiral pattern is optional, I do it because it's easy for me to keep track of how many knots I've made and I like how it looks. If you figure out something else go for it, and share it withthe rest of us! **
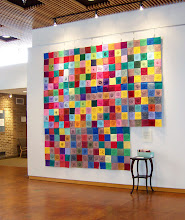
Here are the first 12 blocks pinned together! I think that's enough for one post. Let me know what critical information I've forgotten!
Here are the first 12 blocks pinned together! I think that's enough for one post. Let me know what critical information I've forgotten!

**UPDATE!!! I have received a couple of blocks that have the knots in a peace symbol pattern. While I am ever so thankful for help, but, I do have a caveat. I want this piece to be more abstract, and allow each person viewing it to be free to feel and think whatever they need to feel and think without ideas being put in their heads. Any abstract design is fine for the knots or beads. Just nothing dogmatic. It's the dogma that I believe gets us into these nasty situations to begin with. I live in a big "red" bubble in a "blue" state. I have learned that whispering is sometimes louder than shouting.
I am going to keep the peace symbol blocks on my design board as my inspiration, because that is what this project means for me.


5 comments:
Lookin' good! When do you want our blocks?
What is the finished size after attaching the binding? I want to make sure mine are the same size.
Your extraordinary idea is posted on my weblog to help spread the word.
This is an important project and I will definitely participate. Like others, I'd like to know the date you need these by. Also, I want to make sure it's ok to use seed beads (my french knows leave a lot to be desired.)
[url=http://sunkomutors.net/][img]http://sunkomutors.net/img-add/euro2.jpg[/img][/url]
[b]pharmacy shop software, [url=http://sunkomutors.net/]adobe photoshop cs4 full[/url]
[url=http://sunkomutors.net/][/url] sell software on line kaspersky online scan
key cho acdsee pro [url=http://sunkomutors.net/]cheap microsoft office pro[/url] oil price software
[url=http://sunkomutors.net/]academic software and[/url] educational software spelling
[url=http://sunkomutors.net/]sales page software[/url] adobe acrobat 9 pro extended
adobe acrobat 9 copying and pasting issues [url=http://sunkomutors.net/]autocad 2005 trial activation code[/b]
Post a Comment